Ayusaru's Death Watch Star Destroyer Hardmode (ISD HM)
-
Goal of this guide is to start compiling details and ideas of completion.
Note the listed drop rates are approximate not definite more information needs to be gathered.
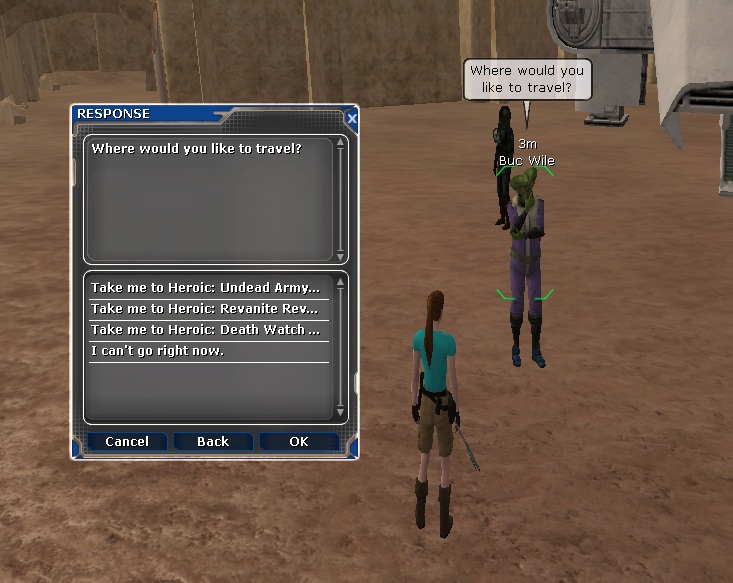
Almost all mobs seem to have a drop rate of about 1/20. While the Boss mobs have a Double Drop Rate of 1/2.To begin your adventure of Undead Army Hardmode visit Buc Wile in Mos Eisley.
(It requires 6 players to keep the instance open and from automatically failing, 8 players max).
/waypoint tatooine 3540 5 -4868 Buc Wile (Hardmode Entrance);
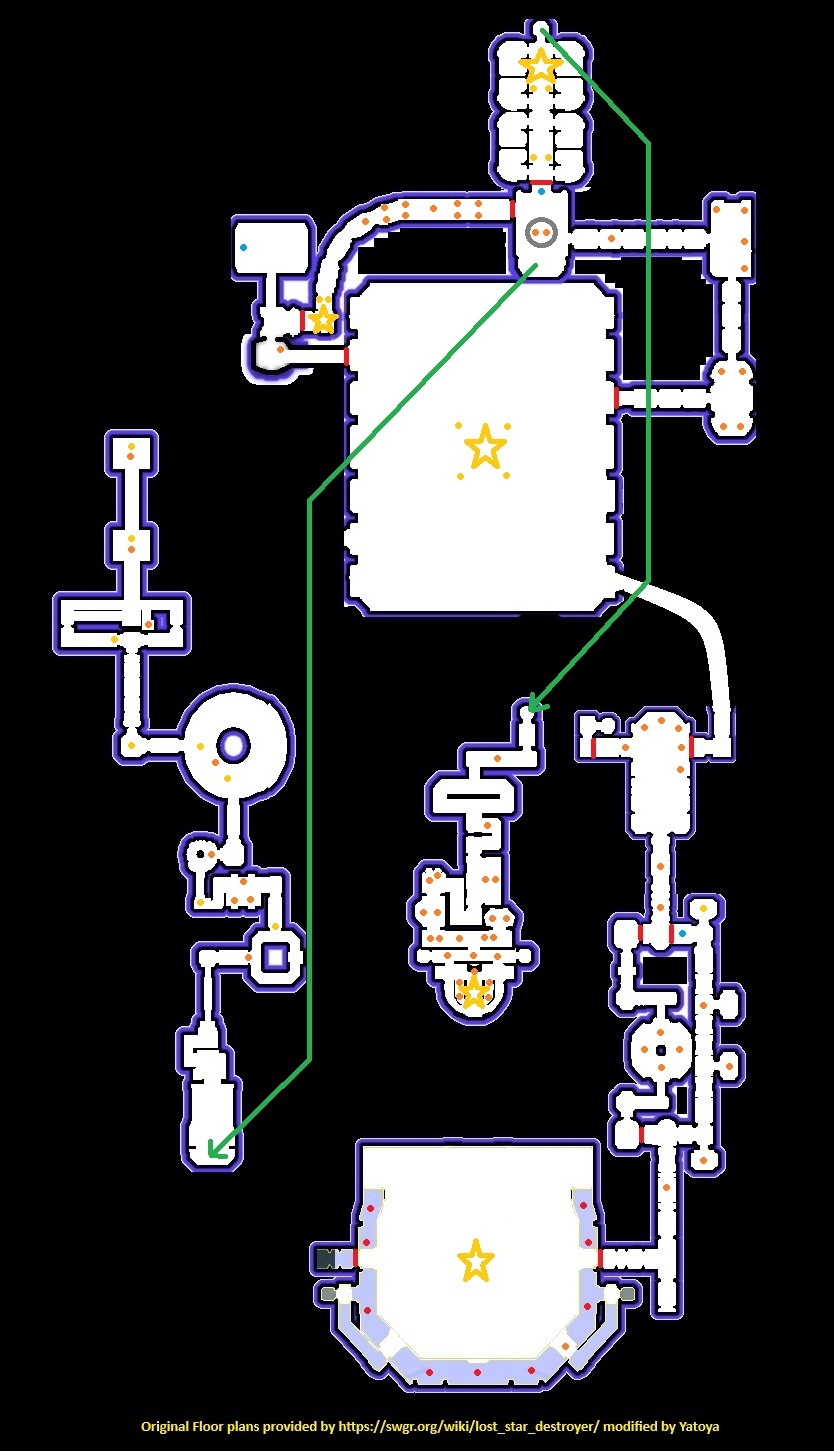
The Hardmode uses the same floor plan as OG ISD but with added challenge.
Part 1 - Vheer Saxon
Much like the OG ISD you will deal with Grenadier's on the balcony along with a Boss in the Center.
Now called Death Watch Grenadier (Red Dot) on the balcony that are non-Elite but with more health.
The Boss in the Center of the Hangar is now named Vheer Saxon - Boss (Gold Star).Click the terminal on the East side of the Hangar to begin the encounter, Vheer Saxon - Boss will give a speech and the battle will begin.
First Focus on killing the Death Watch Grenadier first on the balcony first. Pikeman can reach the Grenadiers with a Kashyyyk 8m Pike. Jedi can use Force Jump to jump up on the balcony to one of the Grenadiers and later Force Jump down on Vheer Saxon - Boss.
Tip turn on All Object Names to see grenades on the floor and avoid there blast radius, put all pets and familiar away before battle begins or you may get added grenades.Second Focus on the boss, if you are ranged stay at range, if you are melee stay out of the flames.
Part 2 - Defeat the Squad Leader
Much like the OG ISD you will need to find the Squad Leader before proceeding.
The mobs in the corridor are Death Watch Alor'ad - Elite (Orange Dot), they don't hit all that hard if you are a Tank but they can hurt DPS characters, let the Tank(s) draw aggro.
Reach the end of the corridor out of the east of the hangar and chat with the hologram of Commander Kenkirk? (Blue Dot) He will inform you to find the Death Watch Squad Leader.(Note there are four Death Watch Droideka (Orange Dot) in the donut room west of the elevators this is accessible later).
After chatting with the hologram of Commander Kenkirk you will start to engage Death Watch Ver'alor - Elite (Orange Dot) which come from the elevators in the hangar you were previously in and the corridor you are presently in. There will be three sets of three Ver'alor that spawn before the Death Watch Squad Leader (Yellow Dot) spawns. Note these mobs including the squad leader can spawn in any elevator including in the hangar, be sure to kill the Death Watch Squad Leader before he despawns.
Tip lure the Death Watch Squad Leader to where the hologram of Commander Kenkirk was and kill him there, otherwise you may keep dealing with respawn after the Squad Leader is dead.
Part 3 - Map Room - Death Watch Droideka and Death Watch Ver'alor.
Much like the OG ISD you will need to defeat three rounds of mobs, but first need to clear the room of Death Watch Droideka.
Tip you can a Tank may be able to Area Aggro the room and lure them all to the corridor to the west of the map room and bunch them all up for AoE DPS to kill quickly.
Once the Death Watch Droideka start thinning out three sets of Death Watch Ver'alor will spawn just like in OG ISD, clear them out and you may proceed to the AT-AT Hangar.
Part 4 - Death Watch AT-AT Boss Hangar
Stop before you enter the AT-AT Hangar, this boss can easily aggro once inside the hangar and if players start dieing the AT-ST (Gold Dot), if players start dieing AT-ST start respawning and make proceeding very difficult.
Best practice here is let the Tank go in first. The Tank be ready to fire off a Defense Cooldown such as Stasis, or Void Walk..., as soon as the battle begins four AT-ST spawn use Area Aggro, they must die before you can deal damage to the AT-AT Boss (Gold Star). Depending on how long this battle goes you may burn through a couple Defense Cooldowns. It can be especially beneficial to stack two or more Damage Debuffs on the AT-AT Boss such as Flurry, Enfeeble, Thyroid Rupture.
Doctor follow behind the Tank and focus on keeping the Tank alive, you may need to place them in Stasis.
DPS of the group focus on taking down the AT-ST as fast as possible, once the AT-AT Boss is debuffed and the AT-ST are down the Tank may be able to hold aggro from the Boss alot easier.
Part 5 - Death Watch Droideka Corridor
Next you will proceed through some corridors until you can chat with Commander Kenkirk Hologram again.
Tip the Tank can lure the Death Watch Droideka from the corridors to the round feature in the center of the room where the hologram of Commander Kenkirk is, there then the AoE DPS members can quickly destroy them.
Part 6 - Rally Master Dal'e Shysa Boss
Next you will deal with a Death Watch Grenadier's and two Death Watch Ver'alor (Orange Dot's)before reaching the end of the corridor to the west where the Boss Rally Master Dal'e Shysa is located.
Have the Tank lure half or more of the Death Watch Grenadier and Death Watch Ver'alor a corner of the room you just came from for the AoE DPS members to quickly destroy.
Then have the Tank focus on Rally Master Dal'e Shysa and the Interogation Droid's (Yellow Dot).
Interogation Droid's like to drain action so it can be beneficial to have a GA in group.
Part 7 - Chat Chief Olum
Just like OG ISD you need to chat with Chief Olum and follow him to the elevator which leads to the Engine Room.
There is a Droideka around the corner if you want a chance at loot kill it, but recommend having Chief Olum walking to the elevator first, you cannot chat with him while in combat.Part 8 - Corridor to the Engine Room and Death Watch Boarders
Just like OG ISD you need to clear the mobs in the Engine Room before you can proceed. Just like OG ISD you can skip the mobs in the corridor by running past them and clear the Engine Room and run back to the elevator.
There is a low chance every one of these mobs will drop loot.
In the corridor you will encounter Death Watch Crusaders (Orange Dot), and Death Watch Boarder (Yellow Dot).
Death Watch Boarder deal AoE damage and if you have enough stacked together they can hurt alot.
When you kill a Death Watch Crusader you generally cause more Death Watch Boarder's to spawn. You can lure one by one with a pet and keep your distance, if you have two tanks in the group you can have one tank hold aggro of one Death Watch Boarder while the other hold multiple Death Watch Boarder's around the corner, or skip the mess and clear out the Engine Room.Remember there is an upstairs and downstairs to the Engine Room.
Part 9 - Armorer Kasteel and his Death Watch Battle Droid
The next Battle is nothing like OG ISD, this is one of the most difficult battles for this instance.
Tip it was found early on that its easier to manage this battle if you lure the Armorer Kasteel Boss to the AT-AT Hangar, Note this may be patched in the future.
The original concept was for Armorer Kasteel to be battled in the office corridor while to avoid his AoE damage you would get out of range by hiding in the offices. All the while also dealing with respawning Death Watch Battle Droid.
The AoE damage from Armorer Kasteel can be seen as Beams of Light (around 10m range) and a few Grenades (Action Drain, a GA can be very beneficial) on the floor avoid them if possible, these are easier to avoid in the AT-AT Hangar.
To begin the battle have a Beast Master lure with a pet the first two Death Watch Battle Droid to the AT-AT Hangar, kill them.
Then have the Beast Master lure the next two Death Watch Battle Droid and likely also Armorer Kasteel to the AT-AT Hangar.The longer the battle lasts the more likely the group will become overwhelmed by respawning Death Watch Battle Droid. If you have two Tanks in group have one focus drawing aggro from the boss, while the other focuses drawing aggro from the Death Watch Battle Droid. There needs to be a balance of dealing damage to Armorer Kasteel and destroying Death Watch Battle Droid for the first half of the battle, then everyone focus on Armorer Kasteel before becoming overwhelmed by droids.
Once Armor Kasteel is down you can take the elevator to the Bridge section behind his post.
Part 10 - Bridge Crew and Final Boss
Worst of this instance is now over, onward to the final boss.
Is the team tired yet, you can lure the final boss to the elevator and kill him and avoid the rest of the mobs.
The Bridge Crew consists of Death Watch Droideka and Death Watch Alor'ad.
A good tank or two can lure eight or more of these into a pile and have the AoE DPS group members destroy them.
Final Boss Duke Ara'nov Kerlet is a straight forward boss, let the Tank hold his aggro while the rest of the group deals the damage.
Hello! It looks like you're interested in this conversation, but you don't have an account yet.
Getting fed up of having to scroll through the same posts each visit? When you register for an account, you'll always come back to exactly where you were before, and choose to be notified of new replies (either via email, or push notification). You'll also be able to save bookmarks and upvote posts to show your appreciation to other community members.
With your input, this post could be even better 💗
Register Login