Ayusaru's Combat Evolved Explanation (WIP 12/27/25)
-
Moving forward this guide is going to be a breakdown of my understanding of Combat Evolved mechanics, some of which are unique to SWG Evolve.
I welcome feedback especially moving forward as I would like to make the information as accurate as possible.STATS:
Borrowing from the SWG Evolve Wiki Page. We are looking at Agility, Constitution, Luck, Precision, Stamina, Strength.
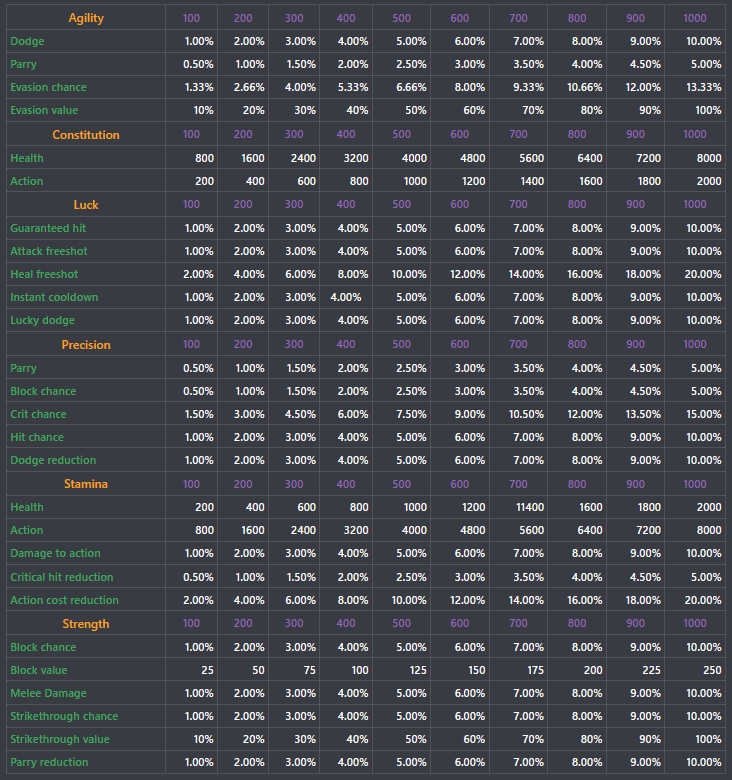
Agility is one of the largest STAT contributors to defense granting more Dodge, Parry, Evasion, Evasion Value.
---Dodge allows a player to successfully avoid a Single Target Hit from Ranged.
---Parry allows a player to successfully avoid a Single Target Hit from Melee while you are equipped with a melee weapon.
------Exception Jedi when equipped with a Lightsaber can avoid a Single Target Hit from Ranged rolling a Parry. Whichever is higher on the player STAT page will be calculated
------between Dodge and Parry.
---Evasion Chance allows a player to Evade some Area of Effect (AoE) Damage.
---Evasion Value determines the % of Evaded AoE Damage upon a successful Evasion.Constitution increases ones Health Pool.
---Health Pool is largely increased by Constitution.
---Action Pool is marginally increased by Constitution.Luck provides a wide variety of benefits in SWG Evolve.
---Guarantee Hit commonly called Lucky Hit, lands before a Lucky Dodge, it is a direct counter to Lucky Dodge.
---Attack Freeshot grants a no action cost of a Attack Ability.
---Heal Freeshot grants a no action cost of a Heal Ability.
---Instant Cooldown commonly called Swift Attack, Swift Heal, Swift Revive. It resets the reuse time of Attack, Heal, Revive Abilities.
---Lucky Dodge prevents a Single Target Hit from landing on the player, rolls before all other Single Target Hits to the player except for Guarantee Hit (Lucky Hit).Precision primary function is to improve Hit Chance. It also grants some defense and offense improvements.
---Parry is slightly improved by Precision. Parry allows a player to successfully avoid a Single Target Hit from Melee.
------Exception Jedi when equipped with a Lightsaber can avoid a Single Target Hit from Ranged rolling a Parry. Whichever is higher on the player STAT page will be calculated
------between Dodge and Parry.
---Block Chance provides a chance for the player to Block some Damage from either Single Target Hits and AoE Damage.
---Crit Chance when successful increases a players Damage on a successful Hit.
---Hit Chance determines the chance of successfully landing a Hit with Single Target Hit. Player has an innate ability to Hit (likely based on level), Hit Chance improves it further.
---Dodge Reduction overcomes a Targets Dodge, increasing the chance of the player successfully landing a Hit using a Ranged Weapon.Stamina primary function is to manage Action Pool.
---Health Pool is marginally increased by Stamina.
---Action Pool is largely increased by Stamina.
---Damage to Action is Action Pool recovered from a successful hit to a target.
---Critical Hit Reduction reduces the chance of receiving a Critical Hit.
---Action Cost Reduction reduces the Action Pool cost of using a special Ability (or Heavy Weapon Default Attack).Strength primary function is to increase Melee Combat abilities.
---Block Chance provides a chance for the player to Block some Damage from either Single Target Hits and AoE Damage.
---Block Value defines the amount of Blocked Damage upon successfully Blocking, represented by amount instead of a percent.
---Melee Damage is an increased amount of Damage that can be delivered while equipped with a Melee Weapon.
---Strikethrough Chance is a chance for the player to bypass an opponents Armor.
---Strikethrough Value is represented by a percent of the amount of Armor bypassed upon a successful Strikethrough Hit.
---Parry Reduction overcomes a Targets Parry, increasing the chance of the player successfully landing a Hit using a Melee Weapon.Common Sources of STATS:
Reverse Engineered Attachments applied to Weapon, Clothing, and Armor.
Reverse Engineered Exotic Attachments applied to Weapon, Shirt, and Chestplate Armor.
Buffs represented by a indicator just below the players Health and Action Pool's.
PuPs (Power Up's) created by Reverse Engineering and can be applied to a equipped Weapon, Shirt, and Chestplate Armor.
Bio Engineered Pet, will not apply direct Agility, Constitution, Luck, Precision, Stamina, and Strength. It will apply sub STATS such as Dodge, Parry, Evasion...
DeBuffs represented by a indicator just below the Buffs located under the Health and Action Pool's. (These can lower sub STATS).Below is the way I view combat.
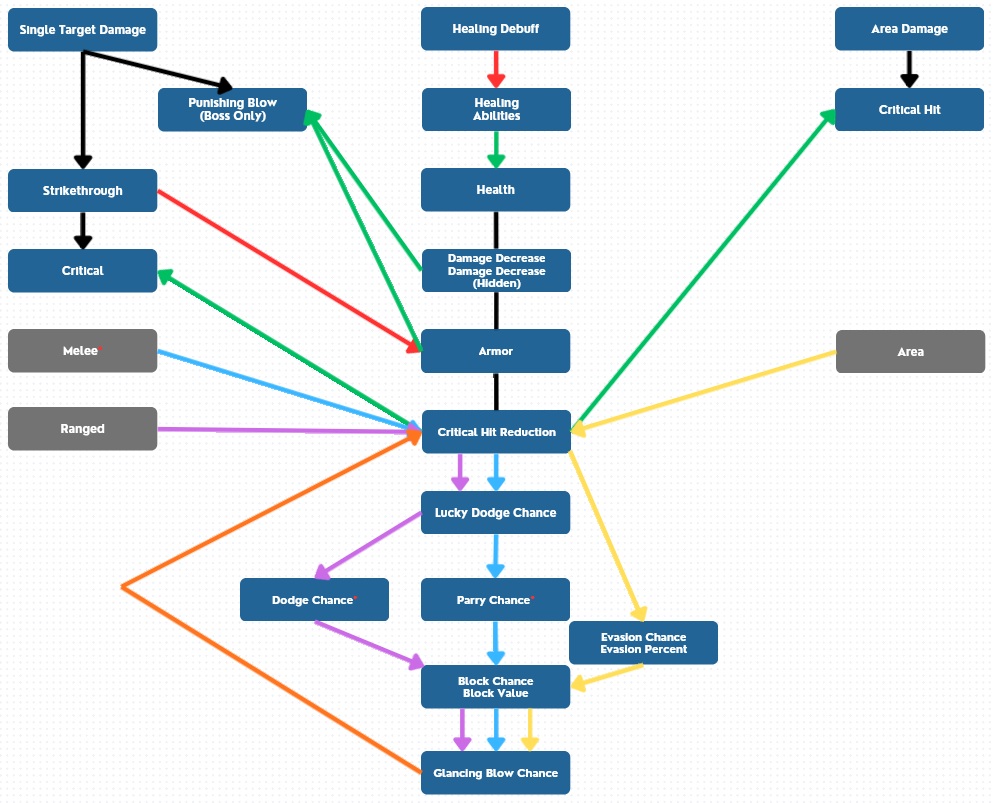
Purpose of this diagram is to explain the relationship between your Defenses and Damage Received. Unlike many diagrams I include Health (Pool), Healing, and Punishing Blows.Health (Pool): When your Health Pool Bar reaches "0" you die.
---Sources of more Health Pool is Constitution and Stamina.
---The larger the Health Pool the more damage you can take.Healing Abilities: Using Healing Abilities can recover your Health Pool.
---Primary Sources of Healing Abilities comes from Heal 4, and Doctor Expertise.
---Healing Potency from Exotic Attachments, PuP's can improve the power of Healing Abilities resulting in a greater amount of Health recovered.
---Soothing Aura plays a greater part in Jedi Healing Abilities then Healing Potency does.Damage Decrease: Reduces the damage received.
---All damage received is reduced.
---Strikethrough does not pass through this defensive layer.
---It can significantly reduce the damage received from Punishing Blows from World Boss.
---Damage Decrease (Hidden), there are a few Damage Decrease that are hidden from the STAT page. Two most common are Tank Stance 15% Damage Decrease, Off the Books (Junk Dealer Buff) 6%.Armor: Consists of Energy, Kinetic, Element Protections.
---Commonly described as numbers such as 5600, 6000, 6600, 8000.
---Innate Armor generally applies to all categories of armor.
---Most damage comes from either Energy or Kinetic along with a small amount of Element damage.
---Few exceptions to high sources of Element damage include Bounty Hunter - Burn (Heat), and Jedi - Lightning (Electricity)
---Strikethrough bypasses Armor.
---High amounts of Armor can significantly reduce the damage received from Punishing Blows from World Boss.Critical Hit Reduction: Reduces the chance of suffering a Critical Hit.
---Directly reduces the chance of receiving a Critical Hit.
---Common sources for Critical Hit Reduction are Expertise, Exotic Attachments, Power Ups (PuPs).Lucky Dodge: Unique to SWG Evolve. Chance of avoiding all Single Target damage.
---Only source of this powerful defense is the Luck STAT.
---Common sources are from Expertise, Food/Drink, Attachments, Power Ups (PuPs).
---Lucky Hit bypasses Lucky Dodge.Dodge Chance: Chance of avoiding all Ranged Single Target damage.
---Only applies to Ranged Single Target damage, not Area damage.
---Common sources are from Expertise, Agility STAT, Attachments (Not Recommended), Power Ups (PuPs) (Not Recommended).
---Unique to SWG Evolve 4.9 Update, Dodge and Parry do not combine to deflect Ranged Single Target damage while wielding a Lightsaber, only the highest of Dodge or Parry applies.Parry Chance: Chance of avoiding all Melee Single Target damage while you are equipped with a melee weapon.
---Only applies to Melee Single Target damage, not Area damage.
---Common sources are from Expertise, Agility/Precision STAT, Food/Drink, Attachments (Not Recommended), Power Ups (PuPs) (Not Recommended).
---Unique to SWG Evolve 4.9 Update, Dodge and Parry do not combine to deflect Ranged Single Target damage while wielding a Lightsaber, only the highest of Dodge or Parry applies.Evasion Chance/Value: Chance of evading/reducing damage from Area Damage.
---Only applies to Area Damage.
---Common sources are from Expertise, Agility STAT, Food/Drink, Attachments (Not Recommended), Power Ups (PuPs) (Not Recommended).
---You first have a chance to evade damage then if you succeed you reduce the damage by a value represented by a percent.Block Chance/Value: Chance of blocking/reducing the final damage received by the Value of Block.
---Generally the final layer of defense that you see in the combat log, see Glancing Blow for why Block is more common then Glancing Blow.
---Block Value is represented by an amount, not a percent.
---Common sources are from Expertise, Strength/Precision STAT, Food/Drink, Attachments, Power Ups (PuPs).
---After you combine Dodge Chance and Parry Chance or Evasion you then add Block Chance.
-----Example you have 15 Dodge Chance you then combine 15 Parry Chance and then combine 45 Block Chance to receive a total of 75 Block Chance.
-----Example you have 15 Evasion Chance you then combine 45 Block Chance to receive a total of 60 Block Chance.
-----Note if you succeed Evasion you reduce the damage by a percent followed by also succeeding by chance Block Chance reducing further damage amount from Area Damage.Glancing Blow: Reduces Damage received by 60%.
---Cannot glance a Critical Hit.
---Critical Hit Reduction synergies well with Glancing Blow.
---Common sources are from Expertise, Attachments, Power Ups (PuPs).
---After you combine Dodge Chance or Parry Chance or Evasion and Block you then add Glancing Blow.
-----Example you have 15 Dodge Chance you then combine 15 Parry Chance and then combine 45 Block Chance then add 6 Glancing Blow chance you get a total of 81 Glancing Blow chance provided you are not receiving a Critical Hit.
-----Example you have 15 Evasion Chance you then combine 45 Block Chance then add 6 Glancing Blow chance you get a total of 66 Glancing Blow chance provided you are not receiving a Critical Hit.
-----Note if you succeed Evasion you reduce the damage by a percent followed by also succeeding by chance Block Chance reducing further damage amount from Area Damage then further chance of reducing damage by 60% by succeeding in Glancing Blow.Healing Debuff: Debuffs applied by players can reduce the power of Healing Abilities.
---Depicted with a RED ARROW because it directly counters Healing Abilities.
---Healing Debuff come from a few Expertise Abilities, (LIST EXAMPLES).Area Damage: Commonly known as AoE.
---Area Damage generally cannot be avoided except by AoE Resist unique to only Commando and Grenadier.
---Area Damage that cannot be avoided can be reduced to 0 Health loss.
---Depicted with a YELLOW ARROW because the defenses that directly apply to Area Damage follow the order of Critical Hit Reduction > Evasion Chance > Block Chance > Glancing Blow Chance.
---Cannot Dodge or Parry Area Damage.
---Area Damage can be enhanced by a Critical Hit to increase the damage.
---Depicted with a GREEN ARROW to highlight that Critical Hit Reduction reduces the chance of receiving Area Damaged enhanced by Critical Hit then follows the following path.
---Area Damage follows the following path... Area Damage > Critical Hit > Critical Hit Reduction (Counter) > Damage Decrease (Counter) > Armor (Counter) > Evasion Chance with Value (Counter) > Block with Value (Counter) > Glancing Blow (Counter if not a Critical Hit).
---Each Chance to reduce Area Damage is added to chance so example 30% Evasion Chance gets added to 70% Block Chance resulting in a 100% Block Chance.
---Example: 10000 Damage Area > ((Critical Hit Chance (PASSED))) = 15000 > 15000 ((Critical Hit Reduction (FAILED))) > 15000 - ((Damage Decrease of 24%)) = 11400 > 11400 - ((Armor 60%)) = 4560 > 4560 - ((Evasion Chance 30% (FAILED)) > 4560 - ((Block Chance 70%+30% (Evasion Chance) = 100% (PASSED) Block Value 1500)) = 3060 Damage Received.
---Example Simplified:
10000 x 1.5 = 15000 - (15000 x 0.24 = 3600) = 11400 - (11400 x 0.60 = 6840) = 4560 - 1500 = 3060.Melee Single Target Damage: These are Hits that only hit a single Target.
---Melee Single Target Damage has a higher chance of being avoided then Area Damage.
---Melee Single Target Damage that cannot be avoided can be reduced to 0 Health loss.
---Depicted with a BLUE ARROW to highlight that Critical Hit Reduction reduces the chance of receiving Single Target Damaged enhanced by Critical Hit then follows the following path.
---Melee Single Target Damage follows the following path... Melee Damage > Strikethrough > Critical Hit > Critical Hit Reduction (Counter) > Damage Decrease (Counter) > Armor (Counter if NO Strikethrough) > Parry Chance (Counter) > Block with Value (Counter) > Glancing Blow (Counter if not a Critical Hit).
---Each Chance to Counter Melee Single Target Damage is added to chance so example 30% Parry Chance gets added to 70% Block Chance resulting in a 100% Block Chance.
---Example: 10000 Melee Single Target Damage > ((Strikethrough (PASSED)) > ((Critical Hit Chance (FAILED))) = 10000 > 10000 ((Critical Hit Reduction (FAILED))) > 10000 - ((Damage Decrease of 24%)) = 7400 > 7400 - ((Armor 60% (FAILED due to Strikethrough with 99% Value)) = 7326 >7326 - ((Parry Chance 30% (FAILED)) > 7326 - ((Block Chance 70%+30% (Parry Chance) = 100% (PASSED) Block Value 1500)) = 5826 Damage Received.
---Example Simplified:
10000 x 1 = 10000 - (10000 x 0.24 = 3600) = 7400 - ((7400 x 0.01 = 74) - 7400 = 7326 - 1500 = 5826.Ranged Single Target Damage: These are Hits that only hit a Single Target.
---Ranged Single Target Damage has a higher chance of being avoided then Area Damage.
---Ranged Single Target Damage that cannot be avoided can be reduced to 0 Health loss.
---Depicted with a PURPLE ARROW to highlight that Critical Hit Reduction reduces the chance of receiving Single Target Damaged enhanced by Critical Hit then follows the following path.
---Melee Single Target Damage follows the following path... Ranged Damage > Strikethrough > Critical Hit > Critical Hit Reduction (Counter) > Damage Decrease (Counter) > Armor (Counter if NO Strikethrough) > Dodge Chance (Counter) > Block with Value (Counter) > Glancing Blow (Counter if not a Critical Hit).
---Each Chance to Counter Melee Single Target Damage is added to chance so example 30% Dodge Chance gets added to 70% Block Chance resulting in a 100% Block Chance.
---Example: 10000 Melee Single Target Damage > ((Strikethrough (PASSED)) > ((Critical Hit Chance (FAILED))) = 10000 > 10000 ((Critical Hit Reduction (FAILED))) > 10000 - ((Damage Decrease of 24%)) = 7400 > 7400 - ((Armor 60% (FAILED due to Strikethrough with 99% Value)) = 7326 >7326 - ((Dodge Chance 30% (FAILED)) > 7326 - ((Block Chance 70%+30% (Dodge Chance) = 100% (PASSED) Block Value 1500)) = 5826 Damage Received.
---Example Simplified:
10000 x 1 = 10000 - (10000 x 0.24 = 3600) = 7400 - ((7400 x 0.01 = 74) - 7400 = 7326 - 1500 = 5826.Punishing Blows (Boss Only): Is unique to only bosses like World Boss.
---Punishing Blows Hit a Single Target.
---Punishing Blows are Hit very hard, generally over 10k damage or more.
---Punishing Blows cannot be enhanced by Critical Hits or Strikethrough.
---Punishing Blows can be countered by Lucky Dodge, Parry/Dodge, Block, but most World Boss have a reduction to overcome these defenses.
---Punishing Blows are best countered with high Damage Decrease and Energy/Kinetic Protection.
---Unique to SWG Evolve you can obtain World Boss Inoculation Stim which reduces chance of suffering a Punishing Blow by 5%.Strikethrough Hit: Enhances a normal damaging Hit by bypassing a targets Armor.
---Strikethrough only bypasses Armor, NOT Damage Decrease.
---Strikethrough is enhanced further with Strikethrough Value represented by a percent.
---Strikethrough is enhanced further with Critical Hit (rare I think that there is a lower chance of Critical Hit if you succeed on Strikethrough).
---Only Defense to Strikethrough is Damage Decrease, or avoid damage all together by Lucky Dodge or Dodge/Parry.Critical Hit: Enhances Damage from a normal damaging Hit.
---I presume that Critical Hit enhances damage by 150% or 1.5.
---Critical Damage can be enhanced through Assassin Expertise.
---Critical Hit can enhance Strikethrough damage.Armor Neglect: Bypass Armor without Strikethrough.
---I presume that Armor Neglect applies to Area Damage.
---Armor Neglect is a percent bypass against Armor.
---Only Defense to Armor Neglect is Damage Decrease, or avoid damage all together by Lucky Dodge or Dodge/Parry.
---Armor Neglect can be found in Swordsman, Heavy Weapon Specialist, Rifleman, and Assassin Expertise.Damage Over Time (DoT's): Is damage that ticks off over a duration of time.
---I presume that Damage Decrease and Armor reduce the amount of damage received by DoT's.
---Commando Expertise has a DoT reduction. Entertainer Inspiration buff can apply a DoT reduction.
---You can cure DoT's with Assassin - Run Its Course, Doctor - Detox or Cure Affliction, Jedi - Hermetic Touch, and Squad Leader - Environmental Purge.
---Heavy Weapon Specialist and Combat Medic have increased DoT Damage.
---Fencer, Carbineer, Heavy Weapon Specialist, Commando, and Combat Medic Expertise have passive and active DoT application.
---Fencer Jewelry Set can stack DoT's that otherwise could not be stacked.Historical reactions: Like × 3
-
Thank you for this, was helpful!
 Could i send you a build i'm working on and get some feedback on it? I picked up the wrong jewellery set when starting out (mis click) and trying to work around it the best I can (was assassin set :rolleyes:) If i could that would be amazing!
 -
joncaedus, post: 1444, member: 1309 wrote:
Thank you for this, was helpful!
Could i send you a build i'm working on and get some feedback on it? I picked up the wrong jewellery set when starting out (mis click) and trying to work around it the best I can (was assassin set :rolleyes:) If i could that would be amazing!In case no one has reached out to you about the jewelry set pick, Chavex said, "We've been kind to folks in that scenario, if you put a ticket in we'll do a one time replacement". We talked about it a bit more and he told me to go to Aurilia and view the sets there. I asked if the char needed to be online for the swap and he said, "Yes pls, once the ticket is in can hit up any of the CSR's in discord when you're available and we'll take care of it".
I did as he suggested and a couple minutes later a CSR responded to my ticket, met me in Aurilia and swapped the sets for me. Hope this helps
Tips for new players. View the sets at Aurilia before opening the jewelry reward. I didn't expect there to be two Assassin sets when I opened mine and as a result I hit back without claiming and it claimed the reward anyway. Thankfully the staff were willing to help even tho I wouldn't have had any problem had I checked the vendors first! 🫶
-
coarm123, post: 1485, member: 1286 wrote:
In case no one has reached out to you about the jewelry set pick, Chavex said, "We've been kind to folks in that scenario, if you put a ticket in we'll do a one time replacement". We talked about it a bit more and he told me to go to Aurilia and view the sets there. I asked if the char needed to be online for the swap and he said, "Yes pls, once the ticket is in can hit up any of the CSR's in discord when you're available and we'll take care of it".
I did as he suggested and a couple minutes later a CSR responded to my ticket, met me in Aurilia and swapped the sets for me. Hope this helpsTips for new players. View the sets at Aurilia before opening the jewelry reward. I didn't expect there to be two Assassin sets when I opened mine and as a result I hit back without claiming and it claimed the reward anyway. Thankfully the staff were willing to help even tho I wouldn't have had any problem had I checked the vendors first! 🫶
Hey, thank you so much for replying! I didn't know you could do that I will view the vendor and send in a ticket, see what happens, thank you so much!
Historical reactions: Like × 1
Hello! It looks like you're interested in this conversation, but you don't have an account yet.
Getting fed up of having to scroll through the same posts each visit? When you register for an account, you'll always come back to exactly where you were before, and choose to be notified of new replies (either via email, or push notification). You'll also be able to save bookmarks and upvote posts to show your appreciation to other community members.
With your input, this post could be even better 💗
Register Login