This guide is just to highlight a few things I prefer to adjust when I first start the game, once many of these are set they remain persistent after each login.
Launcher Window
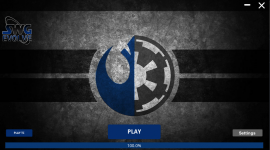
Go to Settings in the bottom right.
Graphics Tab
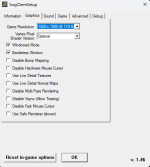
1. Adjust your Game Resolution (I prefer 1920x1080 @ 119(120) Hz, you may want to adjust it to your personal liking, note in SWG Evolve you cannot adjust the GUI much and you may want to run with a lower resolution).
2. Windowed Mode (I prefer this checked as I run multiple character client windows and this option along with Borderless Window allows for quick switching between characters with little interference).
3. Borderless Window (I prefer this checked).
When you first arrive in game after character creation you can access Options by hitting "O".
First Section: Graphics
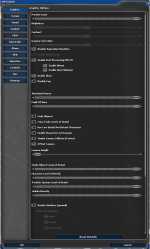
1. I like my details turned up as high as they can go so most sliders are all the way up. Note Shadows I do not use but you may prefer them.
2. Disable Animation Priorities - Checked On (Some animations cause delays and this could possibly effect other abilities from activating right away as they are waiting on previous animations, this is unconfirmed).
3. Disable Fog - Checked Off
4. Fade Objects - Checked Off
5. Use Low Detail for Distant Players - Checked Off
6. Enable Character Lod (Level of Detail) Manager - Checked Off
7. Simple Camera Collision - Checked Off
8. Field of View - Turn All the Way Up (The default all the way down places the camera way to close to the character, all the way up I can see the battlefield more, note it does distort the image a bit like in a fun house).
Second Section: Terrain
1. I would like for it to be all turned on as high as possible but the first 2 sliders reset every time you login so I leave it alone.
Sections: Sound-AFK
1. I leave alone but you may find it beneficial under Chat turn on Timestamps and Verbose Combat Messages.
Nineth Section: Interface
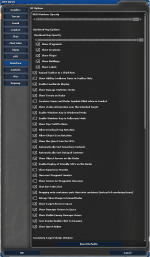
1. Expand Toolbar Third Row - Checked On (***VERY IMPORTANT*** this expands your hotkeys to an additional row).
2. Show Damage Statistics Meter - Checked On (Little added information to help know how much DPS (Damage Per Second) you are dealing).
3. Allow Overhead Map Rotation - Checked On (When you hit "M" you can see the overhead map, walls and buildings, it can be difficult to decipher if this is not enabled).
4. Show Experience Monitor - Checked On/Off (When leveling to 90 I like this enabled but once 90 I prefer it disabled).
5. Onscreen Waypoint Monitor - Checked On (This will help you find your way to quest locations on planet and you can create your own waypoints by typing /way followed by planet, coordinates, name).
6. Dragging onto containers puts item into container - checked On (***VERY IMPORTANT*** this is very annoying if checked off as you will find it less intuitive to organize your inventory and backpack).
Section: Controls
1. I leave alone and adjust some of these things manually in Keymap.
Eleventh Section: MISC
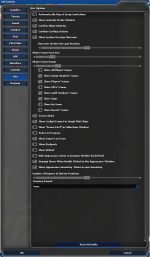
1. Show Network Status Window - Checked On (Experiencing what you think is lag, this will tell you. High ping of over 300 you may be experiencing a second or two of lag delay. High % Packet Loss you may be experiencing really bad lag, server zone may have crashed, or your network may be having issues locally).
2. Auto Loot Corpses - Checked Off (I prefer to manually loot my corpses or use a macro to handle this task).
3. Show Backpack - Checked Off (Unless you like the appearance of your backpack or bandolier, I prefer it off)
4. Show Helmet - Checked Off (Some helmets look awesome like the Mandalorian, others don't and you prefer your hairstyle, this allows you to show your hair style while keeping the helmet protection).
Twelfth Section: Keymap - Character
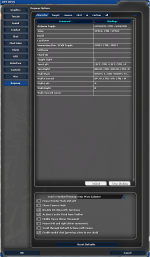
1. Walk Left - Set to A (Note there is the option to Disable Strafing with Turn Keys or change Load a standard keymap : First Person Shooter to achieve similar results, I prefer to manually set this for Walk Left and Right).
2. Walk Right - Set to D.
Twelfth Section: Keymap - Target
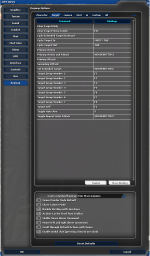
1. Cycle Target In - Set to Shift+Tab.
2. Cycle Target Out - Set to Tab (I prefer these to be opposite from the default, personal preference).
3. Primary Action and Attack - Set to MouseButton1 (Sometimes I like to hold down the mouse button to auto fire my weapon).
4. Set Intended Target - Set to MouseButton2 (Allows me to adjust quickly my target that is highlighted with the mouse pointer).
5. Toggle Repeat Auto Attack - Set to MouseButton3 (Allows quick access to this function to trigger the auto default attack from the mouse).
Twelfth Section: Keymap - Camera
1. Change Nothing
Twelfth Section: Keymap - Chat
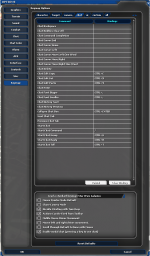
1. Start Chat - REMOVE keymap (***VERY IMPORTANT*** I say this as its very easy to want to press Enter/Return and start chatting, but when you are using multiple character windows there is a bug that occurs when you quickly switch between characters using Alt+Tab and then you go to chat right away by pressing Enter/Return it sends Microsoft Windows the command to go fullscreen which generally will crash the client window).
Twelfth Section: Keymap - UI
1. TAKE NOTE OF THE HOTKEYS as you may be using them frequently.
Twelfth Section: Keymap - Custom
1. This is where your macros are located. I encourage you to make macros the following is a guide to creating common macros that I use when playing SWG Evolve.
 www.swgevolve.com
The GUI (Graphics User Interface)
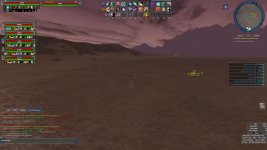
1. Hitting "Y" what does it do, NEW PLAYER ANSWER what is the difference between the Circle with the Dot reticle vs the Plus +, Circle with the Dot is Auto target which if you use auto fire it will automatically start firing when your intended target is selected, in the display above my intended target has been selected as the Nuna displayed in the upper left corner next to my avatar name. If my reticle was set to Plus + auto fire will not work I will be required to hover over the target with the mouse pointer and hold down MouseButton1, it has been noted this gives a slight bonus to hit and crit but generally its not recommended). KEEP IT ON Circle with the Dot.
2. Hitting "Alt" locks or unlocks your mouse pointer.
3. I prefer my Abilities Bar to be located Center Top.
4. I prefer my Network Statistics and Damage Statistics in the Lower Right.
5. I prefer my Radar to be expanded by grabbing the corner and making it larger, I generally will set the range to 128 or 256 meters.
6. Just to the left of my Radar is my damage meter which is a feature of Commando.
7. I prefer my Active Quest to be just below my Radar, you can access your Quest Journal by hitting "J".
8. I prefer below my Active Quest my Waypoint Monitor.
9. Your menus access is the button between the Damage Statistics and the Waypoint Monitor, you can access it via hitting ESC (sometimes multiple times), or pressing it with the mouse pointer.
10. If you have a Bio Pet called you will have access to its Ability Bar and Health/Action Status.
FINAL NOTE
With the above settings with "A" and "D" being adjust it may feel more atune to most first person shooter games using WASD.
You may find it beneficial to hold down the right mouse button on nothing and move your mouse around to adjust the direction you are viewing.
You can cycle through available targets by hitting "Tab".
You may occasionally or frequently need to clear your target by hitting "Esc".
You may occasionally want to auto run in the direction you are facing hit "NumLock"
2 Additional Settings once your character is created.
Hit semi colon ";" navigate to the other tab.
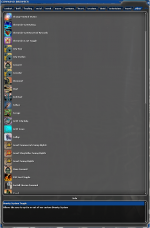
1. Drag Chronicles Loot Toggle to your Abilities Bar, then Select it and either Enable or Disable it. (If you are into creating your own custom quests the loot provided will assist you)
2. Drag ISO Loot Toggle to your Abilities Bar, then Select it and either Enable or Disable it. (If you are into creating Bio Pets or selling ISO's to other players this loot will assist you)
Launcher Window

Go to Settings in the bottom right.
Graphics Tab

1. Adjust your Game Resolution (I prefer 1920x1080 @ 119(120) Hz, you may want to adjust it to your personal liking, note in SWG Evolve you cannot adjust the GUI much and you may want to run with a lower resolution).
2. Windowed Mode (I prefer this checked as I run multiple character client windows and this option along with Borderless Window allows for quick switching between characters with little interference).
3. Borderless Window (I prefer this checked).
When you first arrive in game after character creation you can access Options by hitting "O".
First Section: Graphics

1. I like my details turned up as high as they can go so most sliders are all the way up. Note Shadows I do not use but you may prefer them.
2. Disable Animation Priorities - Checked On (Some animations cause delays and this could possibly effect other abilities from activating right away as they are waiting on previous animations, this is unconfirmed).
3. Disable Fog - Checked Off
4. Fade Objects - Checked Off
5. Use Low Detail for Distant Players - Checked Off
6. Enable Character Lod (Level of Detail) Manager - Checked Off
7. Simple Camera Collision - Checked Off
8. Field of View - Turn All the Way Up (The default all the way down places the camera way to close to the character, all the way up I can see the battlefield more, note it does distort the image a bit like in a fun house).
Second Section: Terrain
1. I would like for it to be all turned on as high as possible but the first 2 sliders reset every time you login so I leave it alone.
Sections: Sound-AFK
1. I leave alone but you may find it beneficial under Chat turn on Timestamps and Verbose Combat Messages.
Nineth Section: Interface

1. Expand Toolbar Third Row - Checked On (***VERY IMPORTANT*** this expands your hotkeys to an additional row).
2. Show Damage Statistics Meter - Checked On (Little added information to help know how much DPS (Damage Per Second) you are dealing).
3. Allow Overhead Map Rotation - Checked On (When you hit "M" you can see the overhead map, walls and buildings, it can be difficult to decipher if this is not enabled).
4. Show Experience Monitor - Checked On/Off (When leveling to 90 I like this enabled but once 90 I prefer it disabled).
5. Onscreen Waypoint Monitor - Checked On (This will help you find your way to quest locations on planet and you can create your own waypoints by typing /way followed by planet, coordinates, name).
6. Dragging onto containers puts item into container - checked On (***VERY IMPORTANT*** this is very annoying if checked off as you will find it less intuitive to organize your inventory and backpack).
Section: Controls
1. I leave alone and adjust some of these things manually in Keymap.
Eleventh Section: MISC

1. Show Network Status Window - Checked On (Experiencing what you think is lag, this will tell you. High ping of over 300 you may be experiencing a second or two of lag delay. High % Packet Loss you may be experiencing really bad lag, server zone may have crashed, or your network may be having issues locally).
2. Auto Loot Corpses - Checked Off (I prefer to manually loot my corpses or use a macro to handle this task).
3. Show Backpack - Checked Off (Unless you like the appearance of your backpack or bandolier, I prefer it off)
4. Show Helmet - Checked Off (Some helmets look awesome like the Mandalorian, others don't and you prefer your hairstyle, this allows you to show your hair style while keeping the helmet protection).
Twelfth Section: Keymap - Character

1. Walk Left - Set to A (Note there is the option to Disable Strafing with Turn Keys or change Load a standard keymap : First Person Shooter to achieve similar results, I prefer to manually set this for Walk Left and Right).
2. Walk Right - Set to D.
Twelfth Section: Keymap - Target

1. Cycle Target In - Set to Shift+Tab.
2. Cycle Target Out - Set to Tab (I prefer these to be opposite from the default, personal preference).
3. Primary Action and Attack - Set to MouseButton1 (Sometimes I like to hold down the mouse button to auto fire my weapon).
4. Set Intended Target - Set to MouseButton2 (Allows me to adjust quickly my target that is highlighted with the mouse pointer).
5. Toggle Repeat Auto Attack - Set to MouseButton3 (Allows quick access to this function to trigger the auto default attack from the mouse).
Twelfth Section: Keymap - Camera
1. Change Nothing
Twelfth Section: Keymap - Chat

1. Start Chat - REMOVE keymap (***VERY IMPORTANT*** I say this as its very easy to want to press Enter/Return and start chatting, but when you are using multiple character windows there is a bug that occurs when you quickly switch between characters using Alt+Tab and then you go to chat right away by pressing Enter/Return it sends Microsoft Windows the command to go fullscreen which generally will crash the client window).
Twelfth Section: Keymap - UI
1. TAKE NOTE OF THE HOTKEYS as you may be using them frequently.
Twelfth Section: Keymap - Custom
1. This is where your macros are located. I encourage you to make macros the following is a guide to creating common macros that I use when playing SWG Evolve.
Ayusaru's Macro Guide
This is not an end all guide to making macros, I will cover a basic design for making combat macros, assist macros, miscellaneous macros. First off lets get the 3rd row on the Abilities Bar, Hit "O" which brings up Options window, select Interface, then check Expand Toolbar to a Third Row...
 www.swgevolve.com
The GUI (Graphics User Interface)

1. Hitting "Y" what does it do, NEW PLAYER ANSWER what is the difference between the Circle with the Dot reticle vs the Plus +, Circle with the Dot is Auto target which if you use auto fire it will automatically start firing when your intended target is selected, in the display above my intended target has been selected as the Nuna displayed in the upper left corner next to my avatar name. If my reticle was set to Plus + auto fire will not work I will be required to hover over the target with the mouse pointer and hold down MouseButton1, it has been noted this gives a slight bonus to hit and crit but generally its not recommended). KEEP IT ON Circle with the Dot.
2. Hitting "Alt" locks or unlocks your mouse pointer.
3. I prefer my Abilities Bar to be located Center Top.
4. I prefer my Network Statistics and Damage Statistics in the Lower Right.
5. I prefer my Radar to be expanded by grabbing the corner and making it larger, I generally will set the range to 128 or 256 meters.
6. Just to the left of my Radar is my damage meter which is a feature of Commando.
7. I prefer my Active Quest to be just below my Radar, you can access your Quest Journal by hitting "J".
8. I prefer below my Active Quest my Waypoint Monitor.
9. Your menus access is the button between the Damage Statistics and the Waypoint Monitor, you can access it via hitting ESC (sometimes multiple times), or pressing it with the mouse pointer.
10. If you have a Bio Pet called you will have access to its Ability Bar and Health/Action Status.
FINAL NOTE
With the above settings with "A" and "D" being adjust it may feel more atune to most first person shooter games using WASD.
You may find it beneficial to hold down the right mouse button on nothing and move your mouse around to adjust the direction you are viewing.
You can cycle through available targets by hitting "Tab".
You may occasionally or frequently need to clear your target by hitting "Esc".
You may occasionally want to auto run in the direction you are facing hit "NumLock"
2 Additional Settings once your character is created.
Hit semi colon ";" navigate to the other tab.

1. Drag Chronicles Loot Toggle to your Abilities Bar, then Select it and either Enable or Disable it. (If you are into creating your own custom quests the loot provided will assist you)
2. Drag ISO Loot Toggle to your Abilities Bar, then Select it and either Enable or Disable it. (If you are into creating Bio Pets or selling ISO's to other players this loot will assist you)
Last edited:

